


Plans & Pricing
About Gavel
Careers
Product Wishlist

Intake and document automation are the gateway drug to productization. Take the first step by building a tech tool to automate your intake and generate documents immediately.

So you've thought about building your own "TurboTax for law", but you don't want to hire a developer? Well, this is your guide on how to build a powerful legal app or workflow on Gavel to gather data and generate documents at every phase of your case. You'll learn how to create an online intake survey (like you'd create on Typeform or SurveyMonkey). It will collect and manage client data and automatically populate into your case documents and agreements at your command. Then, you can even add a paywall to your publicly-facing workflow to charge clients for access.
All of this - gathering client data through a questionnaire, storing the data, and generating complex documents - can be done without using any code.
Here, we're going to teach you how to build an intake app. This guide is comprised of three parts:
You can choose to display the documents to the client, review and send them to the client later, or store the data for use in future document sets.
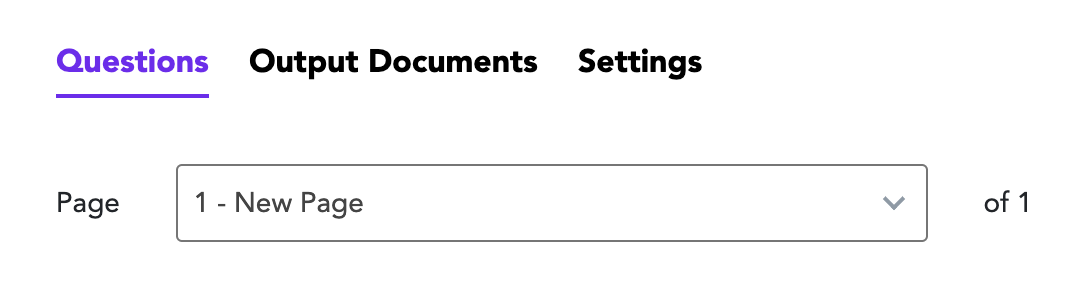
Today, we'll automate a basic application for an estate planning questionnaire. You'll start in the Gavel workflow builder interface, where you'll see three tabs: (1) the Questions tab, (2) the Output Documents tab, and (3) the Settings tab:
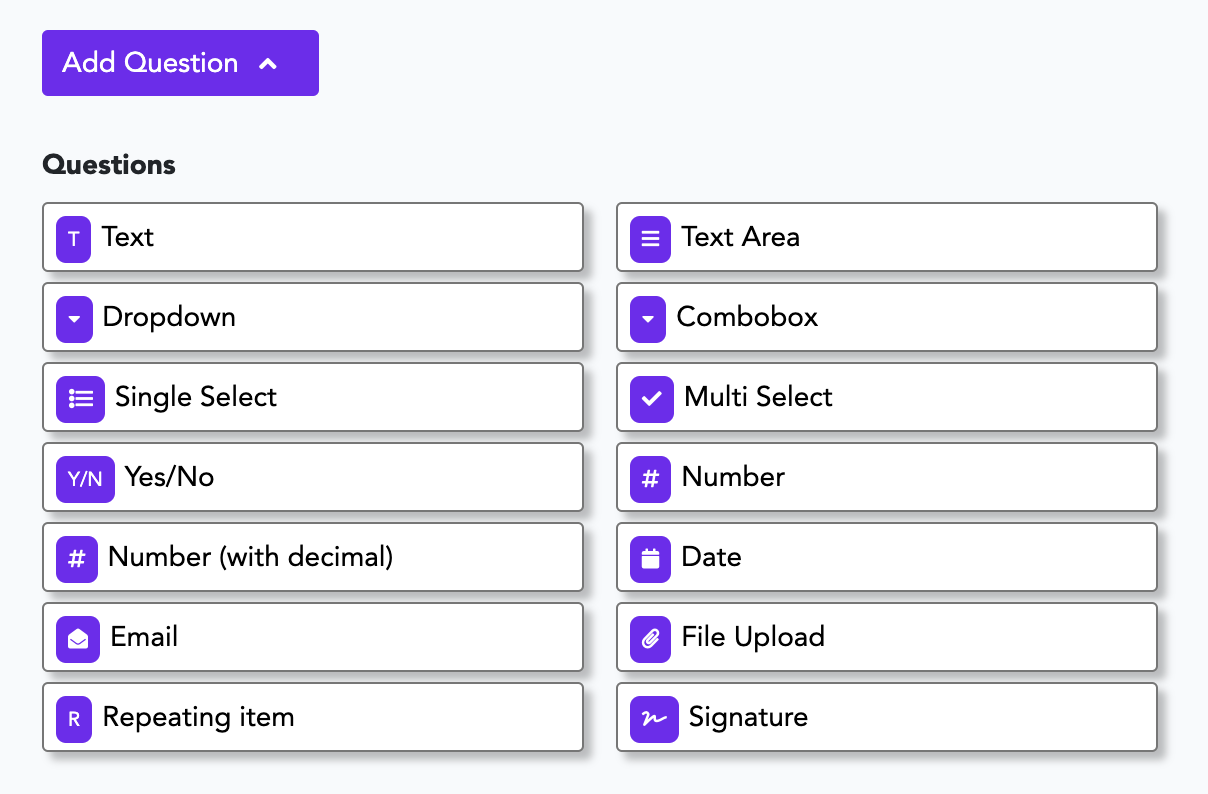
The first thing we're going to do is create all of the questions that are relevant to our documents (the data we want to enter about the client, or that we want the client to enter). As you can see, we have a variety of different questions to choose from:
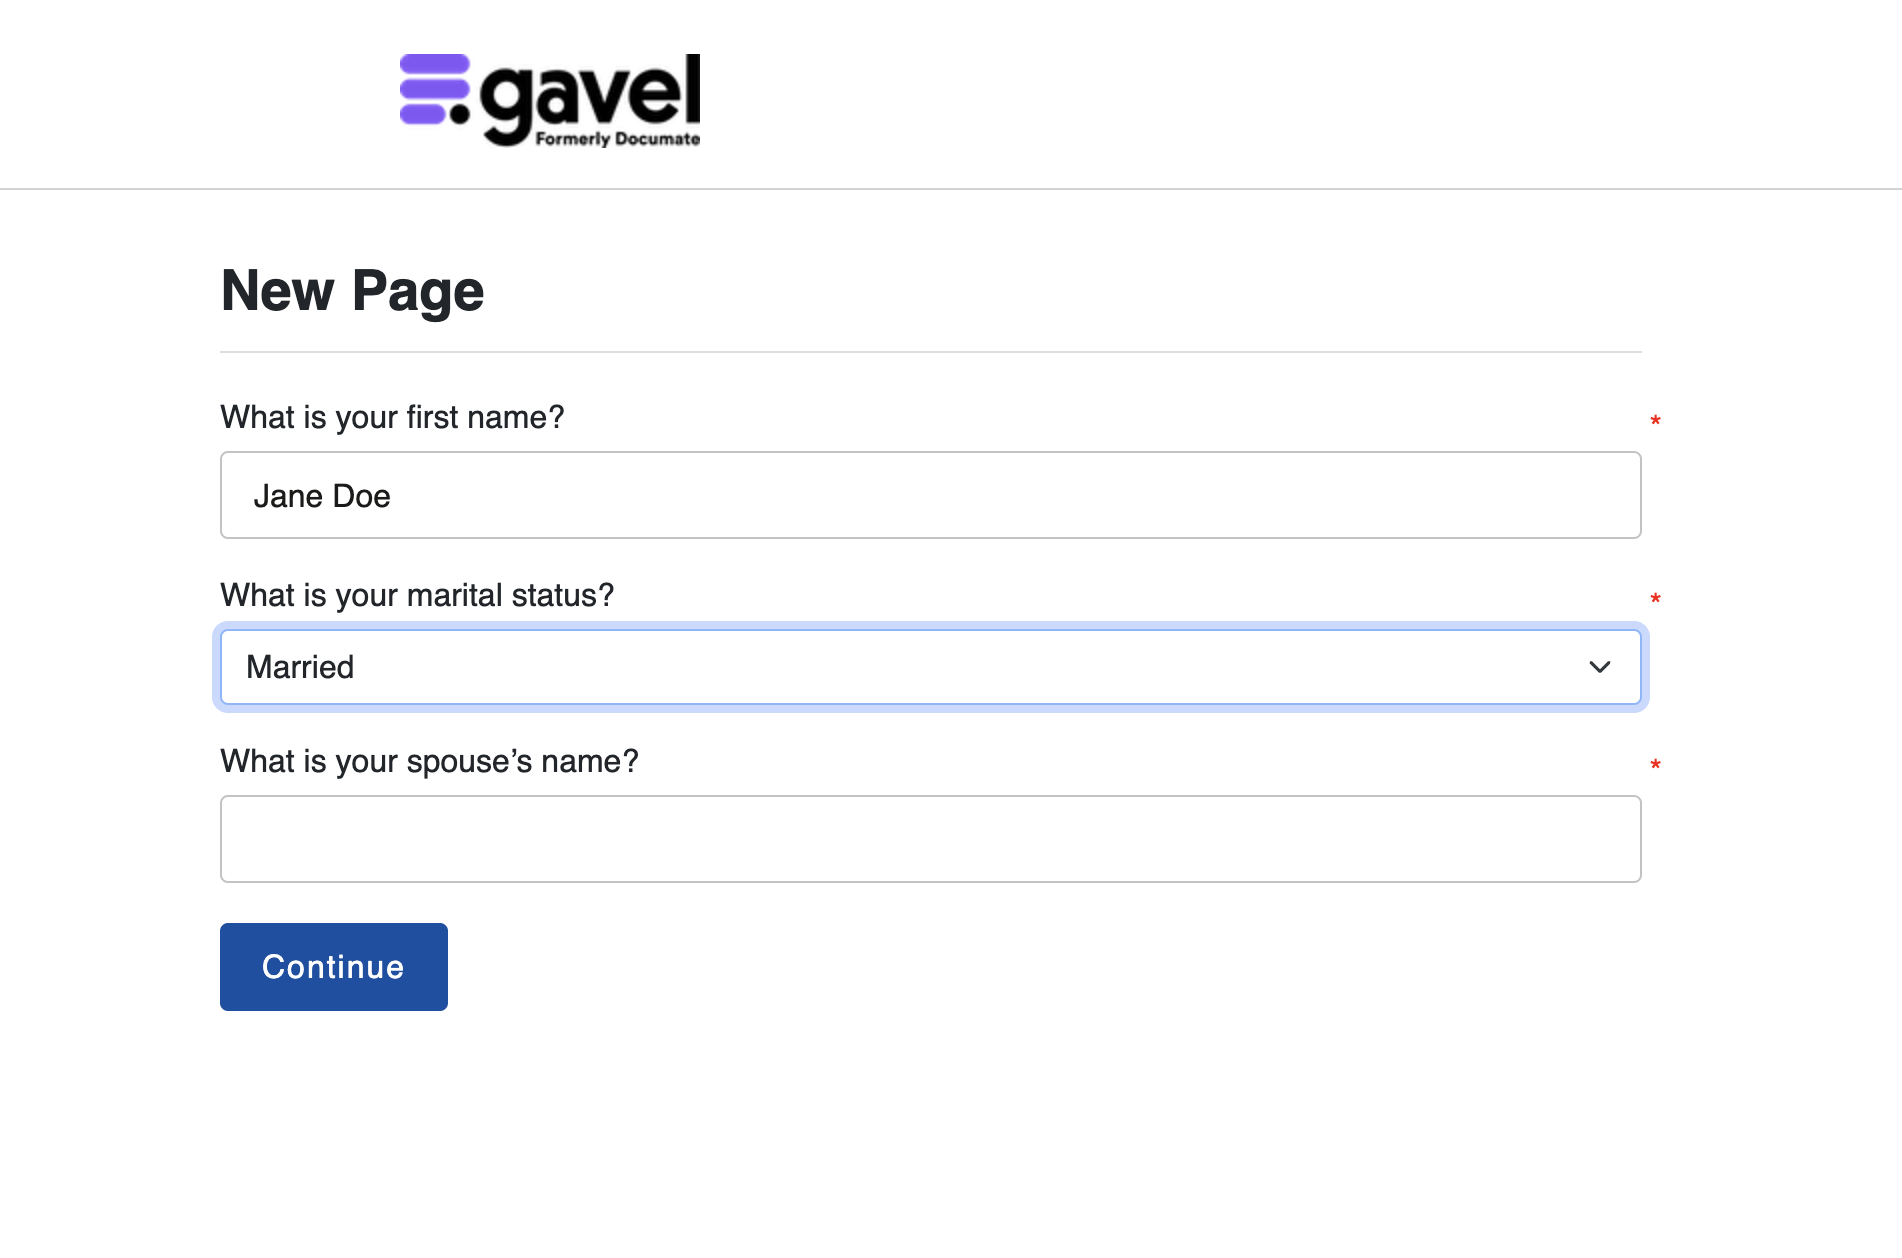
Since we're gathering information for an estate plan in this example, we'll start with a Text question-type on Page 1 that asks the person's first name. This means that when we launch this legal app, the user can free-type the response in the box, with no limitations.
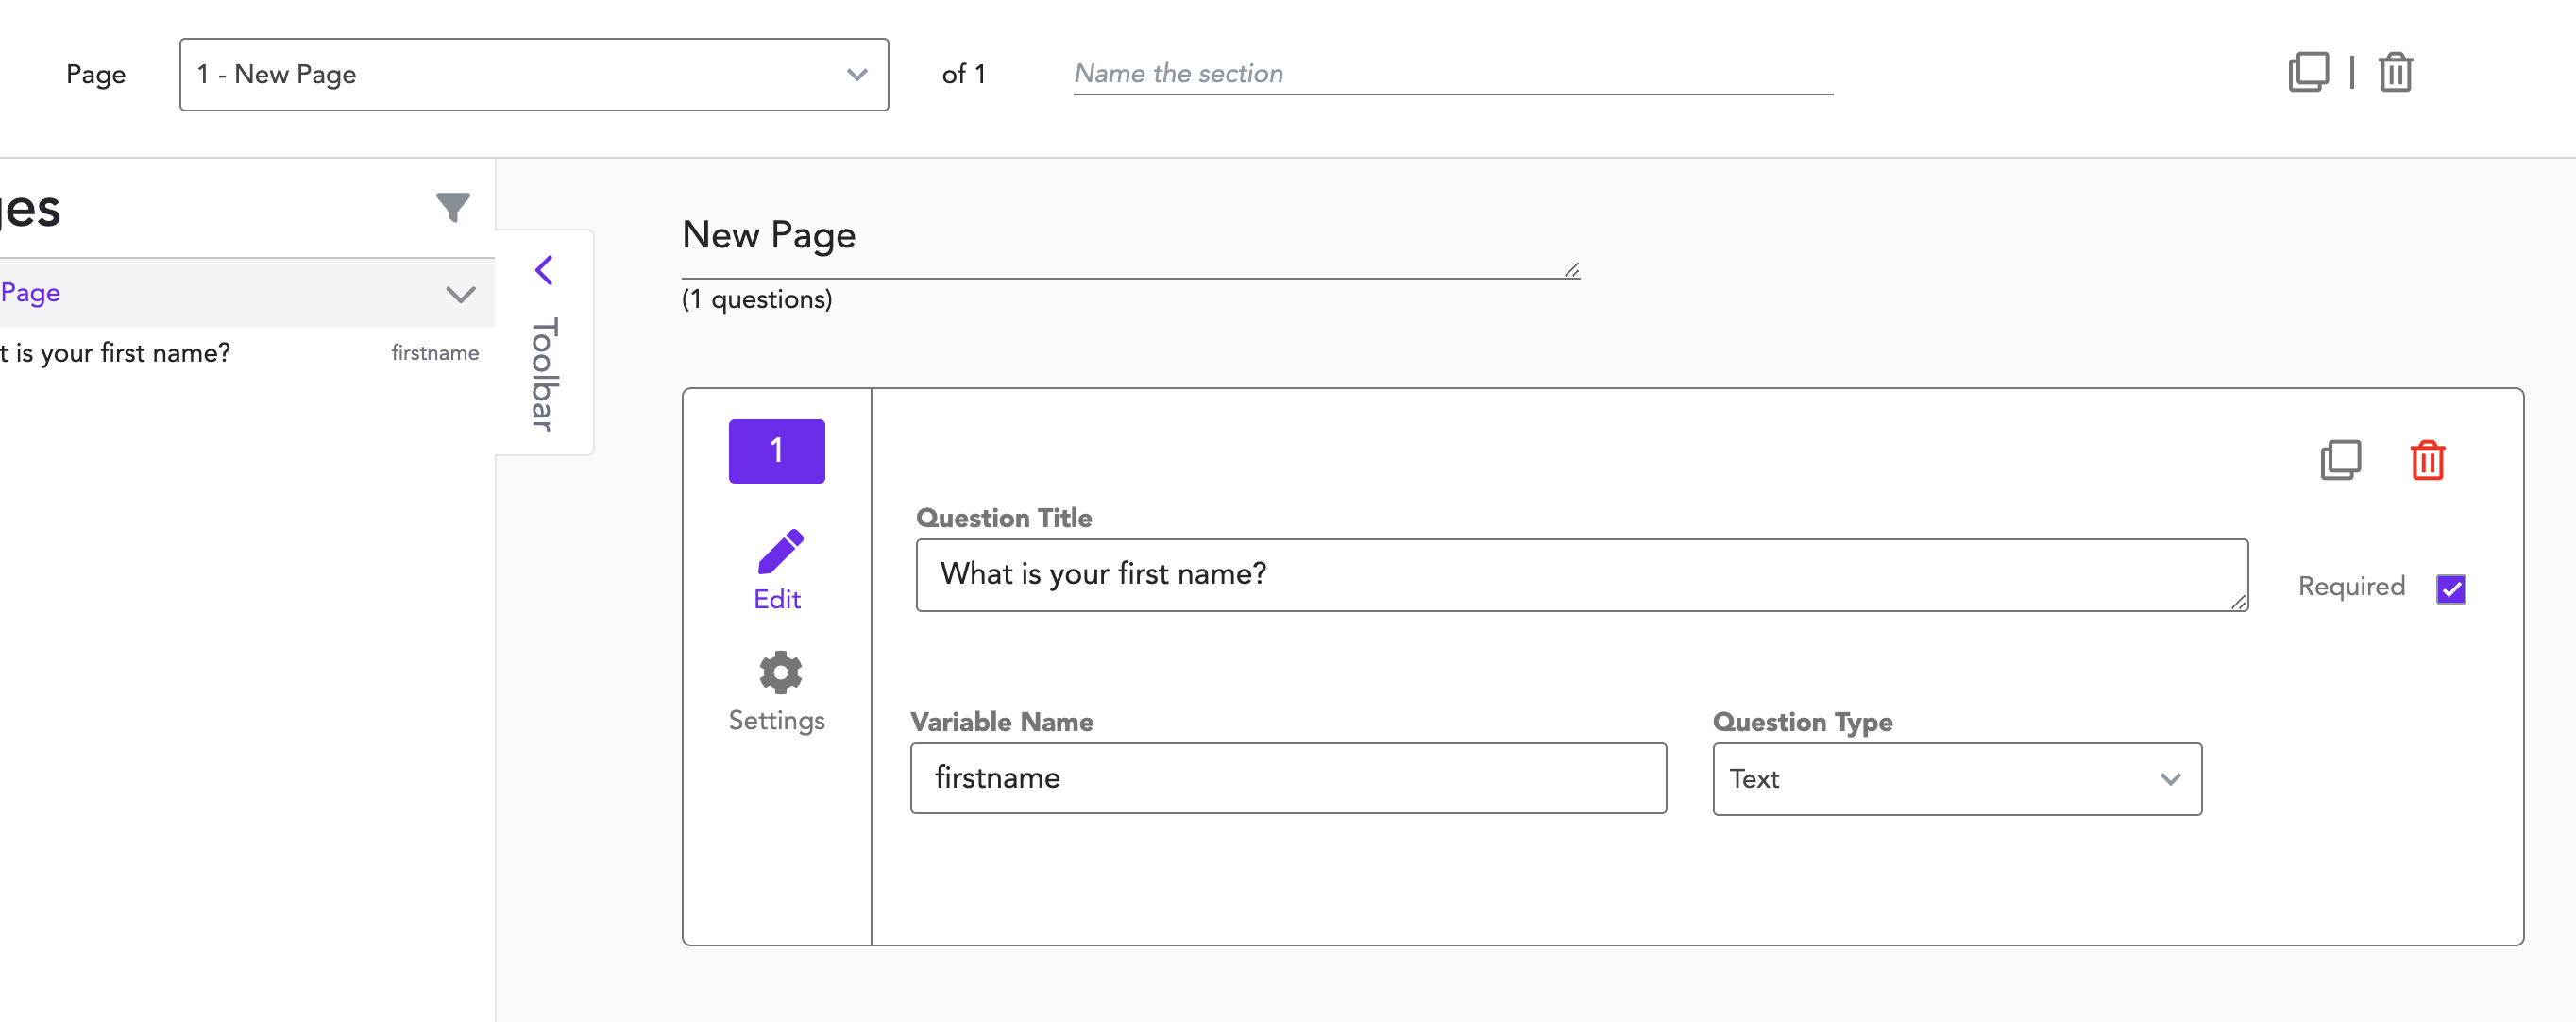
Each question we add as we're building our legal app will also get its own Variable Name. You can choose whatever variable name you want. However, we recommend using something that matches the question. In the example above, we gave the question the variable name firstname because it closely matches the question, and it's understandable for us.
What are we going to do with the variable names? Several things:
Let's start with question logic. Let's say we asked a multiple choice question about the user's marital status, like in Question 2 below. Then, immediately afterwards we want to ask the user's spouse's name. However, we only want to ask the user's spouse's name if the user is married, not if they are single or divorced.
So, we'll toggle over to the branching logic arrows on the left of the question (you can switch between Edit and Logic). Then, select Show if ... maritalstatus ... is ... Married.
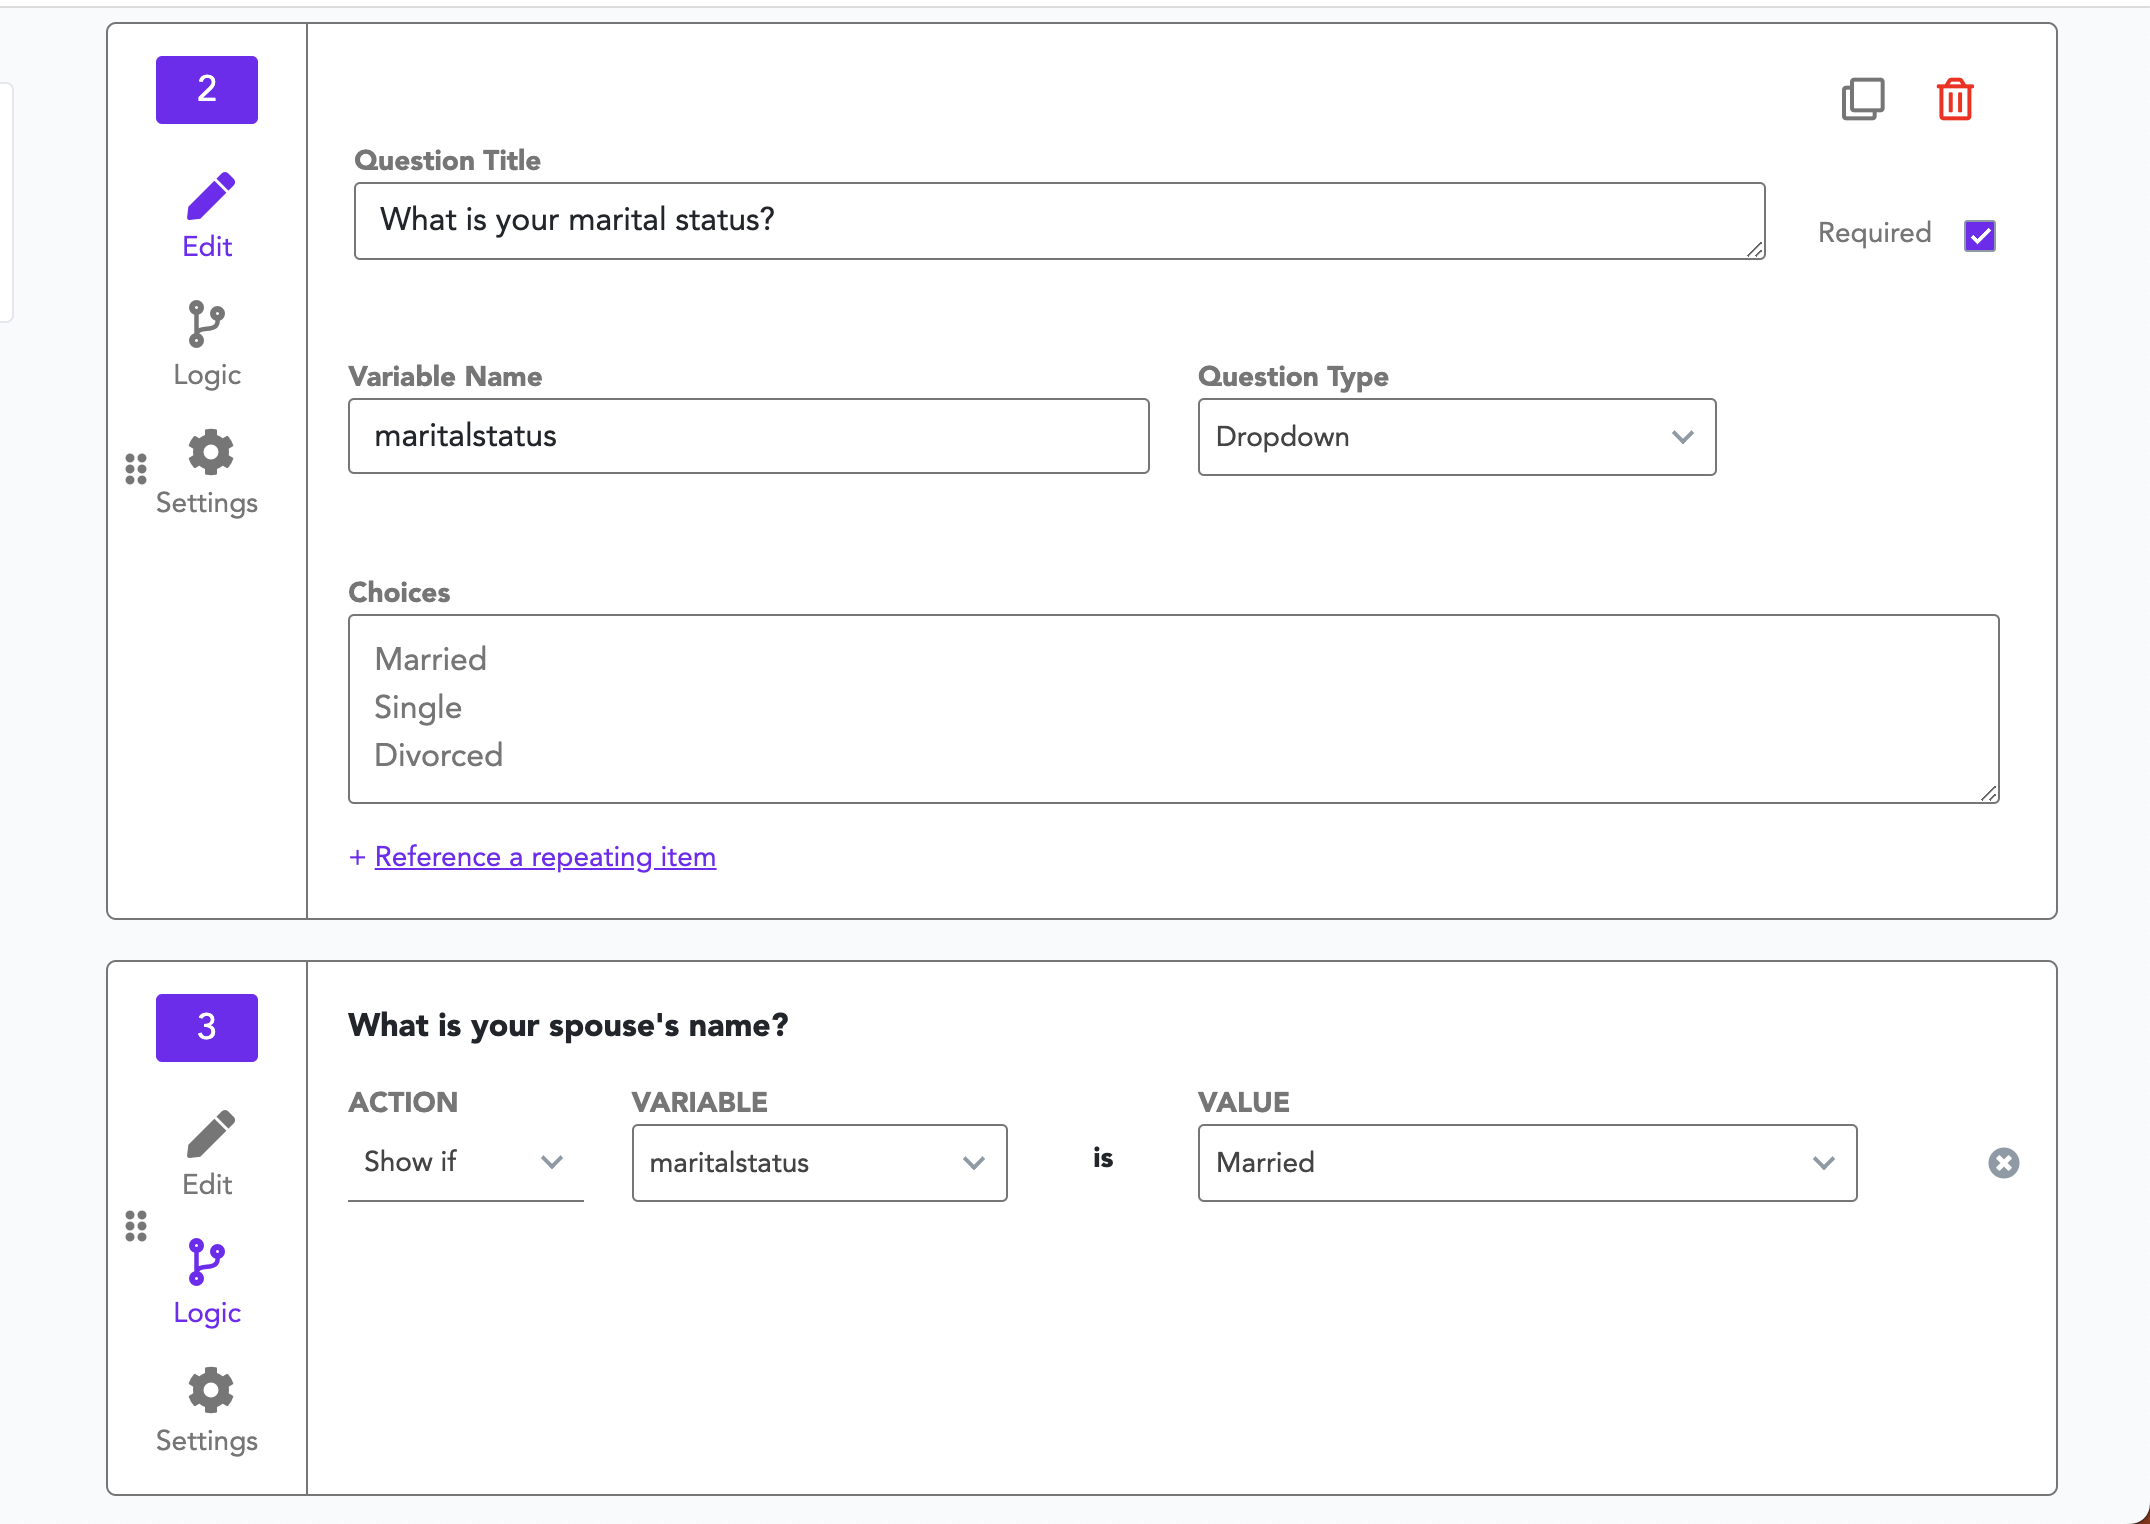
Now, when we run our workflow, we will only see the question about the "spouse's name" if the user selects that their marital status is married.
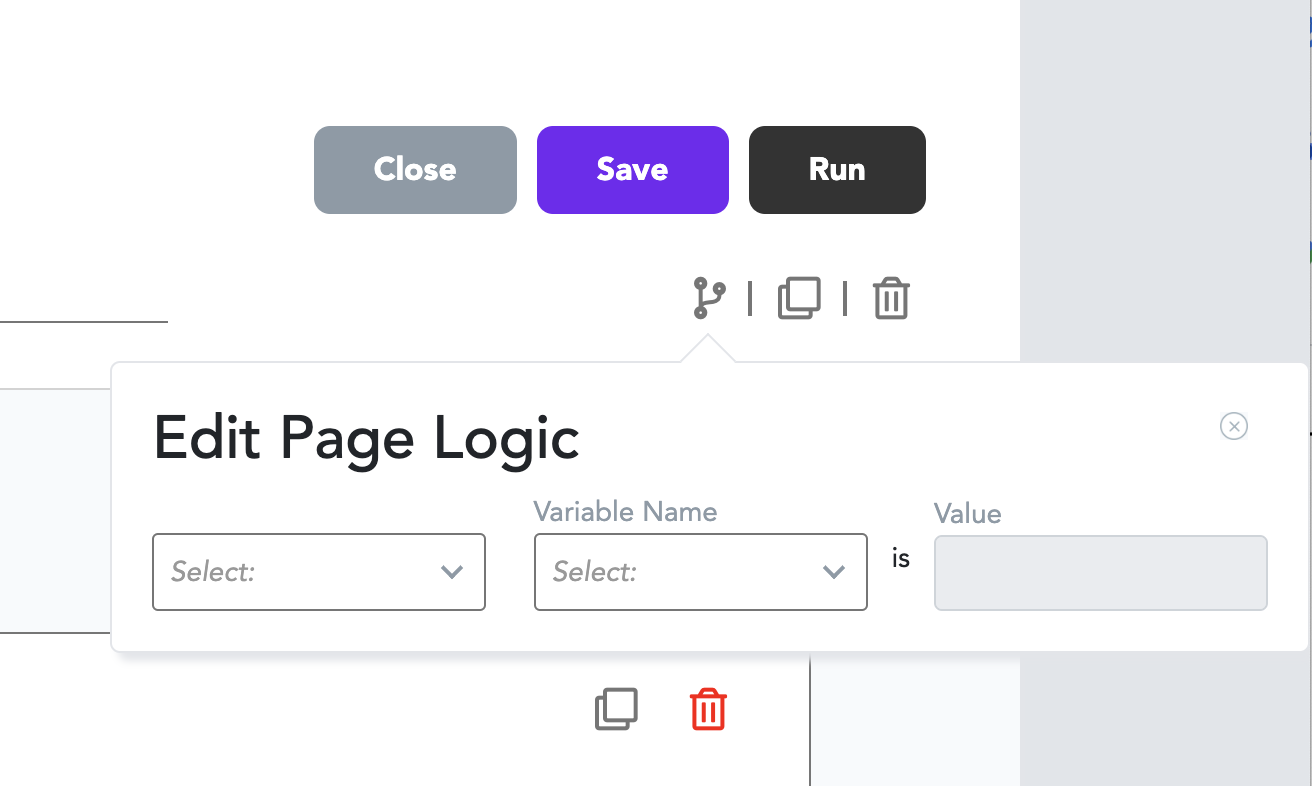
When you are asking the end-user multiple questions, you will want to break up the questions between multiple pages. Each page can have questions dedicated to the topic of that page. For example, you might have a page about identifying information, another page about the spouse's information, and others about children, stepchildren, executors, alternates, etc.
Page logic will be set exactly like question logic, but at the very top of the page. Page logic will allow you to dictate conditional logic for entire groups of questions in your legal app, like this:
Now, we're done setting up the questions we want to ask to gather the relevant client data for this legal app. But we don't just want to gather data - we want to generate smart documents. In this case, since we're building an estate planning legal app, perhaps we want to automate a Will, a Power of Attorney, and a Health Care Directive.
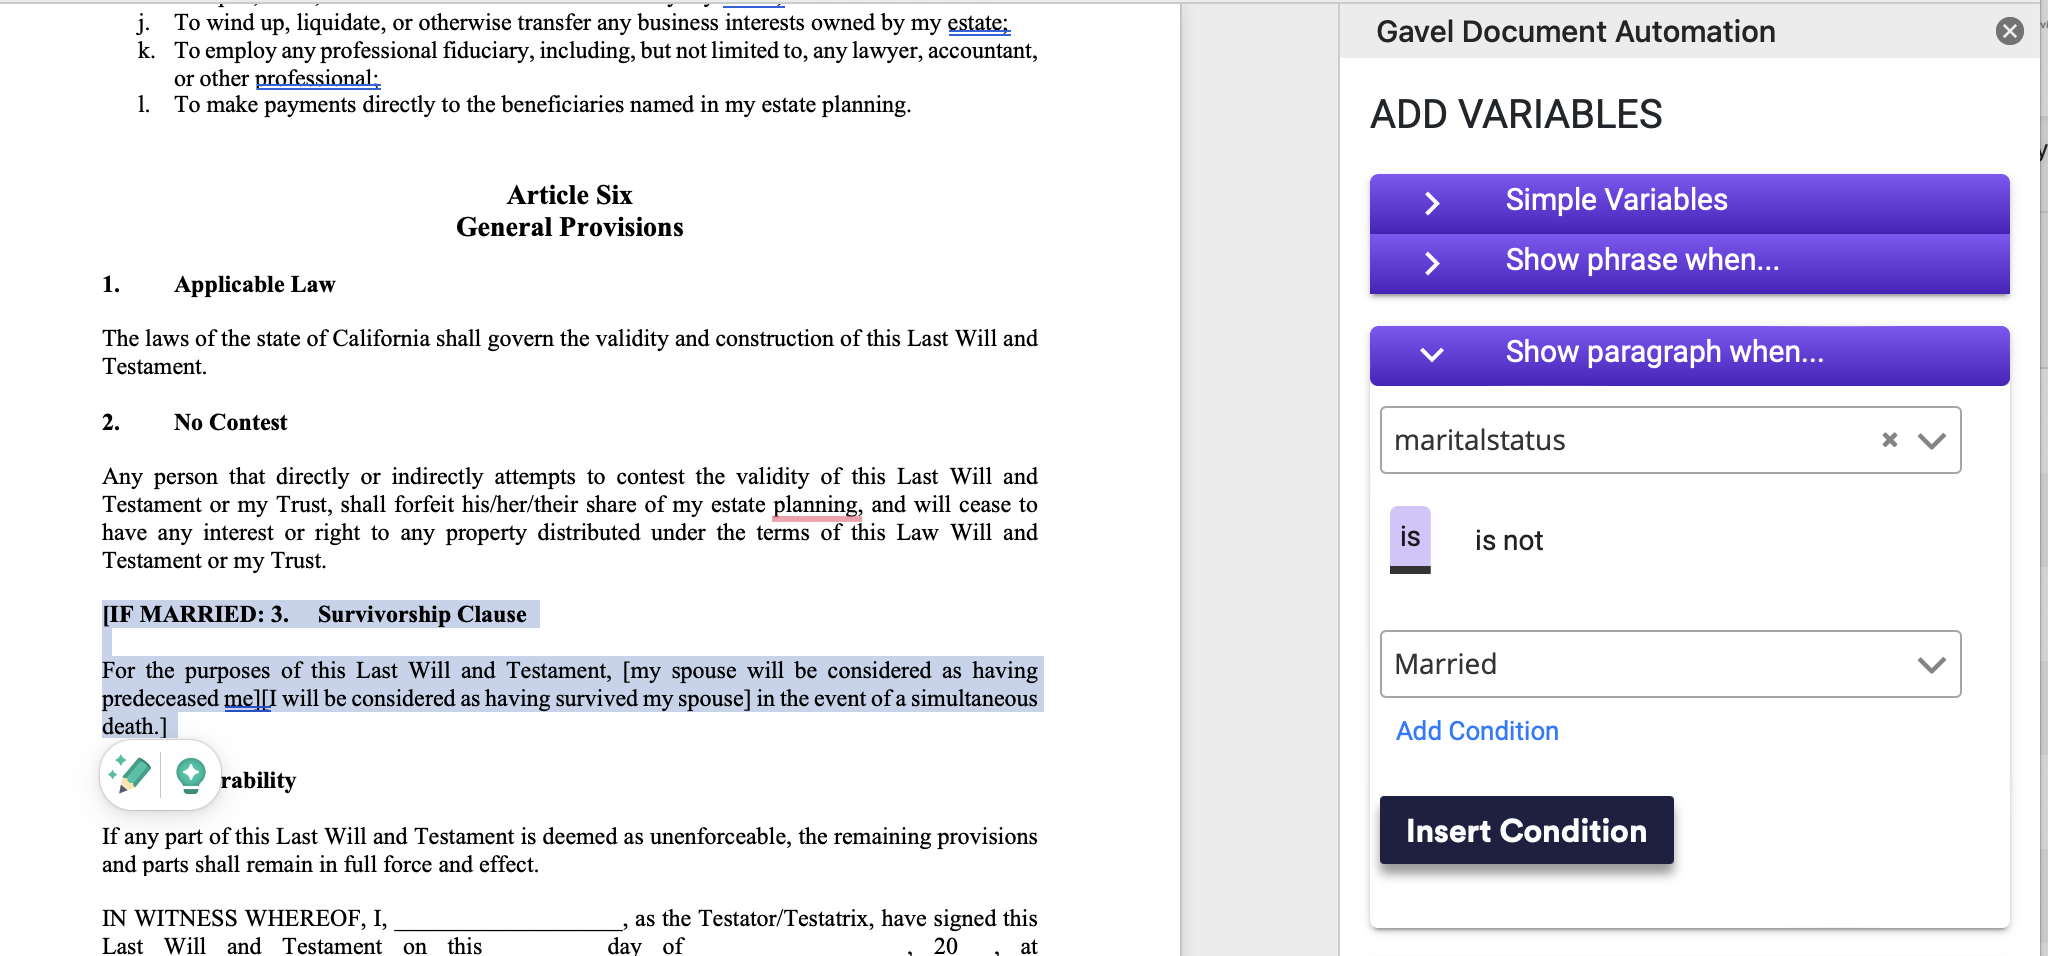
We'll set up our documents directly in Microsoft Word, where we already have our templates. To do so, we'll use the Gavel Word Add-In (which works on all versions of Microsoft Word - online, for PC and for Mac). Because we're in Microsoft Word, formatting we already have in our documents (e.g., pleading paper, logos, headers, field codes) will all remain intact in the final version.
What can you do in your documents? Several things, which we'll show you below, including:
To use the add-in, you'll highlight your paragraph in the document and then select the conditions you want to set around it. In the example below, we are setting a conditional paragraph, which means that the paragraph will only appear in the document when the conditions in the sidebar are met. These are variables that we used in our questionnaire:
Now we've set up our first document. We will set conditions, nested conditions, calculations and formatting to all of the documents we want to generate at the end of the workflow. Then, you'll load the documents to Output Documents.
Ok, now comes the exciting part. You've set up your questions, you've set up and loaded your documents. Now, you're ready to launch your legal app into the world.
Click "Run," and here you go:
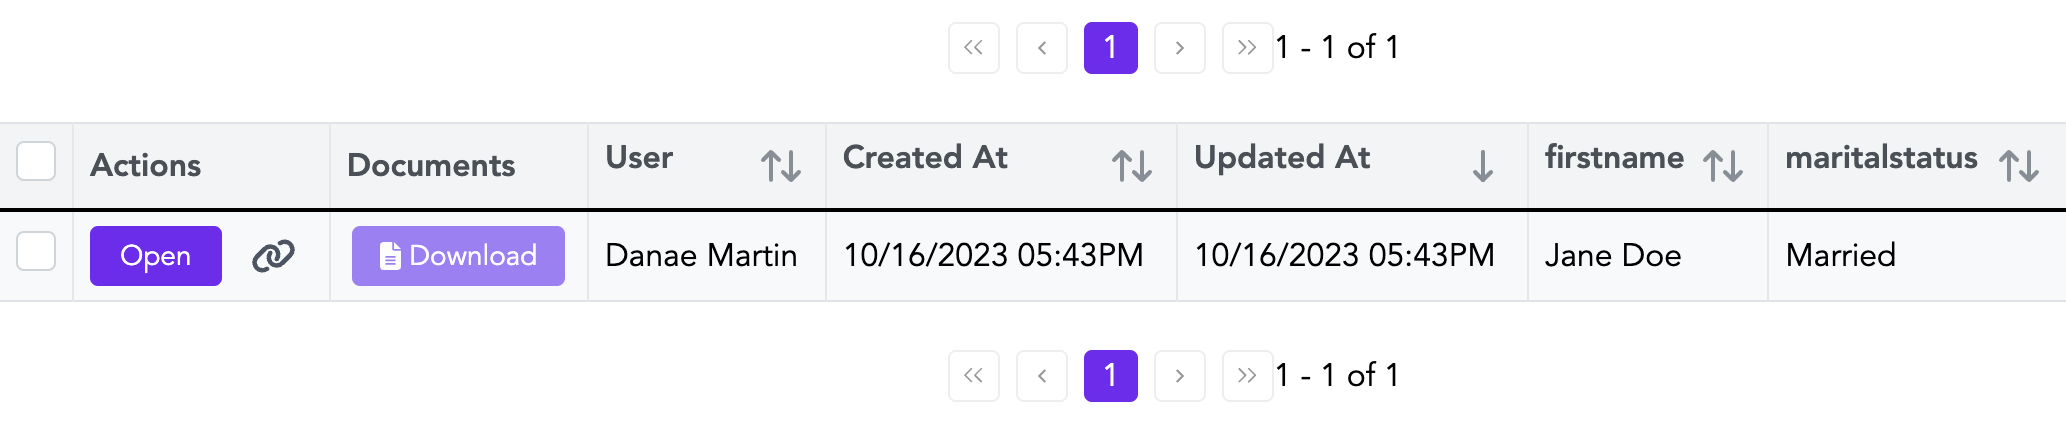
When you click "Run," the legal app you built will open up in another tab. You can share the link to your legal app internally, send it out to your clients, or embed it on your website. Every entry will then be stored in your Data Manager on the Master Dashboard.
As you can see below, the Data Manager stored an entry by our client Jane Doe on 10/16/23:
The entries from our clients are flowing in. Using Data Manager, we have several options. We can:
How have other law firms built legal apps in various areas of law? Check our our case studies page to read more.
Now that you've gone through this tutorial, you know how to build a legal app. Most lawyers think Gavel's document automation software is easy to use and intuitive. But you don't have to do it yourself. If you don't have time or just have too many forms to automate yourself, let us know! We can connect you with a developer (one of the Gavel Automation specialists - or "Gavel Experts" - on our platform). They'll take over and build everything for you.
Sign up for our newsletter to get product updates, exclusive client interviews, and more.


.svg)